Menu

DRAK Assembly Instructions

25-02-2014

DRAK (Din RAcK) from ACA-Apex Ltd is a high quality wall mounted enclosure designed for housing building control switchgear; lighting control and other DIN mounted equipment. It is unique in that it can also be used as a 19" rack and has an 11U capacity. The enclosures are stackable, and provided clearance for door opening is allowed, units can be mounted side by side. Important Before you start to assemble the DRAK enclosure you must decide which side you want the door to open and ensure that there is room for the swing out operation of the door. ASSEMBLY Mount the Back Panel (a) to the wall using suitable wall fixings for the installation (wall fixings are not included). The spacings for the mounting nuts are shown in the dimensions section of this document. Mount the Left and Right Side Plates (b and c) onto the 5mm studs on the Back Panel (a) using an M5 nut and washer on each of the 4 studs and tighten using an 8mm spanner or socket. Please note that one of the side panels has a leg sticking out to the front, these are part of the door closing and lock mechanism, the panel without the rails sticking out to the front should be mounted on the side where the door is to be hinged. Mount the Bottom Plate (d) by inserting the 5mm studs into the Side Plates (b and c) using an M5 nut and washer on each of the 4 studs and tighten using an 8mm spanner. Please note that the top and bottom plates have a hinge pin on one side only for mounting the door, so in selecting the bottom plate it should be the one with the hinge pin pointing upwards on the side that you have chosen to hinge the door. Mount the Top Plate (d) onto the non hinged side of the enclosure by inserting the 5mm studs into the Side Plates (b or c) using an M5 nut and washer on each of the 2 studs DO NOT TIGHTEN YET. Place 2 of the nylon washers onto the hinge pin on the Bottom Plate, and locate the Door (f) onto the hinge pin, then push the door into the closed position. Hold the remaining 2 nylon washers onto the hinge pin hanging down from the Top Plate (d) and pull the top plate down onto the Side Plate (b or c) and Door (f) at the same time so that the 5mm studs and hinge pin are correctly aligned and slot into the holes firmly. Attach an M5 nut and washer on the 2 remaining 5mm studs on the Top Plate (d) and then tighten nuts on each of the 4 studs on the Top Plate. Attach the Cover Plate (e) over the cable entry slot on the Top Plate (d) using the 2 M3 screws supplied. This slot must be covered if trunking is not used. Attach the quantity of Din Rails (g) required using the 6mm cage nuts and screws supplied. The Side Plates (b & c) have 4 sets of 3 holes on the rear and the cage nuts should be attached to the centre one of the 3 holes, the remaining holes are for cable management.

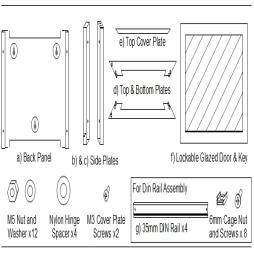
Visit the ACA Apex website for more information on DRAK Assembly Instructions

ENQUIRY FORM

More News

  • Speaker Terminology

  • DRAK Assembly Instructions